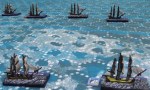
This weekend the local HMGS-South group played a WWI naval game using the Seekrieg 5 rules. A German squadron has bombarded Newcastle and is returning home but is spotted by a British dirigible. While still 200 miles from Heligoland, it is intercepted by a British squadron to the SSW.
British Squadron:
Armored cruisers Defence, Shannon
Light cruisers Arethusa, Aurora
The Pillau uses its speed to pass the head of the British squadron. The British light cruisers are at the rear and attempt to close with the German line without fouling the range for the armored cruisers.
A lot of shooting but no significant damage. The Pillau holds her fire to avoid interfering with the heavier ship’s gunnery.
The Arethusa is blown up by the Prinz Adalbert.
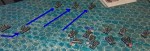
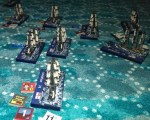
View from the east. The Pillau runs down the back side of the British line, taking heavy fire and launching a torpedo.
Alas, poor Yorck has blown up.
We quit after 11 turns due to the time. On the British side, Defence and Shannon were lightly damaged with no critical hits, Arethusa was gone and Aurora was down to 16 knots with boiler and engine damage. On the German side, Roon had more than 40% damage and had lost a main turret, Yorck was gone, Prinz Adalbert had light damage and Pillau had medium damage.
This weekend the local HMGS-South group played a WWI naval game using the Seekrieg 5 rules. Initially the game was set up with a four ship division on each side, but we scaled it down to two ships on each side due to the low holiday weekend turnout.
The forces started 20,000 yards apart in good visibility. The British had two Iron Duke class battleships and the Germans had the Baden and a Konig class. The players rolled for crew quality and all ended up the same. The game ended when the lead British ship was destroyed by a magazine explosion.
This weekend the local HMGS-South group played a WWI naval game using the Seekrieg 5 rules. The scenario was based loosely on the situation in the Falklands in December 1914, but with significant historical revisions to produce a more balanced battle.
The scenario deviates from history just before von Spee’s squadron reaches the Falklands. Von Spee is alerted to the presence of a strong British force, hides until dawn on 9 December and then uses the cover of fog to start for the Argentine coast. The British divide their forces to search, and one element finds the Germans. The scenario was scaled to give one ship to each of the five players.
German: armored cruisers Scharnhorst and Gneisenau, light cruiser Dresden.
The German ships (especially Scharnhorst) were given an advantage in crew quality to help the scenario balance.
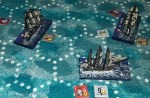
The opponents are just coming into sight, having been hidden by the fog-shrouded headlands. A Lion class model is standing in for the Invincible.
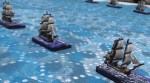
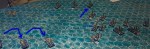
On the left, Dresden leaves the formation and heads toward the Bristol using evasive maneuvering. On the right, the Bristol opens the range. The Invincible is beyond the visibility limit of 12,000 yards.
All ships are accelerating at their maximum rate. The Germans close, presenting a bow aspect.
Due to the poor visibility, most of the early fire is ineffective.
The fog bank blocks fire.
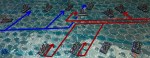
The blue stones indicate ships under fire for calculating over-concentration penalties.
Invincible turns to cross the German T.
… and keeps turning to close to point-blank range of Scharnhorst.
Positions at the close of the game. Scharnhorst is on fire.
After about 4.5 hours of play, we stopped play. Damage was about even, mostly to Scharnhorst and Invincible. No ship had been sunk or crippled.
Saturday the local HMGS-South group played a Seven Years’ War naval game using the Flying Colors rules. The scenario was the battle of Minorca, 20 May 1756. The ship models are Old Glory miniatures. The scenario from the rule book starts after the approach and Byng’s tack to bring his fleet onto a parallel course with the French (Tunstall, Naval Warfare in the Age of Sail, Chapter 4). The scenario does not specify a wind speed, so the wind barb in the first photo is arbitrarily set to 10 knots.
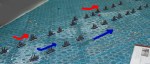
The starting positions from the Flying Colors rule book. The British are to windward. All ships are on a reach.
The French maintain the line while the rear British ships close in. The leading ships exchange fire.
The rear French ships bear off to maintain their distance from the British.
We had to quit after about 3.5 hours of play. At that point, the French had taken mostly hull damage and the British had taken mostly sail damage. Most ships were undamaged since fire had been concentrated on a few ships.
Saturday the local HMGS-South group played a Revolutionary War naval game at the Dogs of War shop using the Flying Colors rules. The scenario was a simplified version of the battle of Cape Henry, 16 March 1781. Old Glory miniatures were used instead of the games ship counters.
The British line split into two formations and attempted to double the French van, but the French maneuvered downwind to avoid this. A 120 degree wind shift then gave the French the weather gage. The British sustained more damage overall, although the leading French ship accumulated enough hull damage to strike her colors.
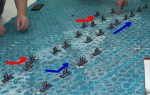
With nine ships in each fleet, only the leading ships fit on the table at the start.
On the second turn the British split into two formations. The French maneuver in a single line for several more turns.
A stern rake forces the leading French ship to strike.
The British switch from formation commands to group commands.
The rear of the French line comes into action at long range.
The flagship of the British second in command is nearly dis-masted. The British struggle to maneuver around the crippled French ship which has struck.


You must be logged in to post a comment.